
After a victory in game one against the Forces of the Abyss and a narrow loss in game two to the Dwarfs the Halflings prepare for game three. As fate would have it, this game would be against the Ratkin Slaves that absolutely tore them apart at The Hinckley Heist in February, but had they learnt any lessons?
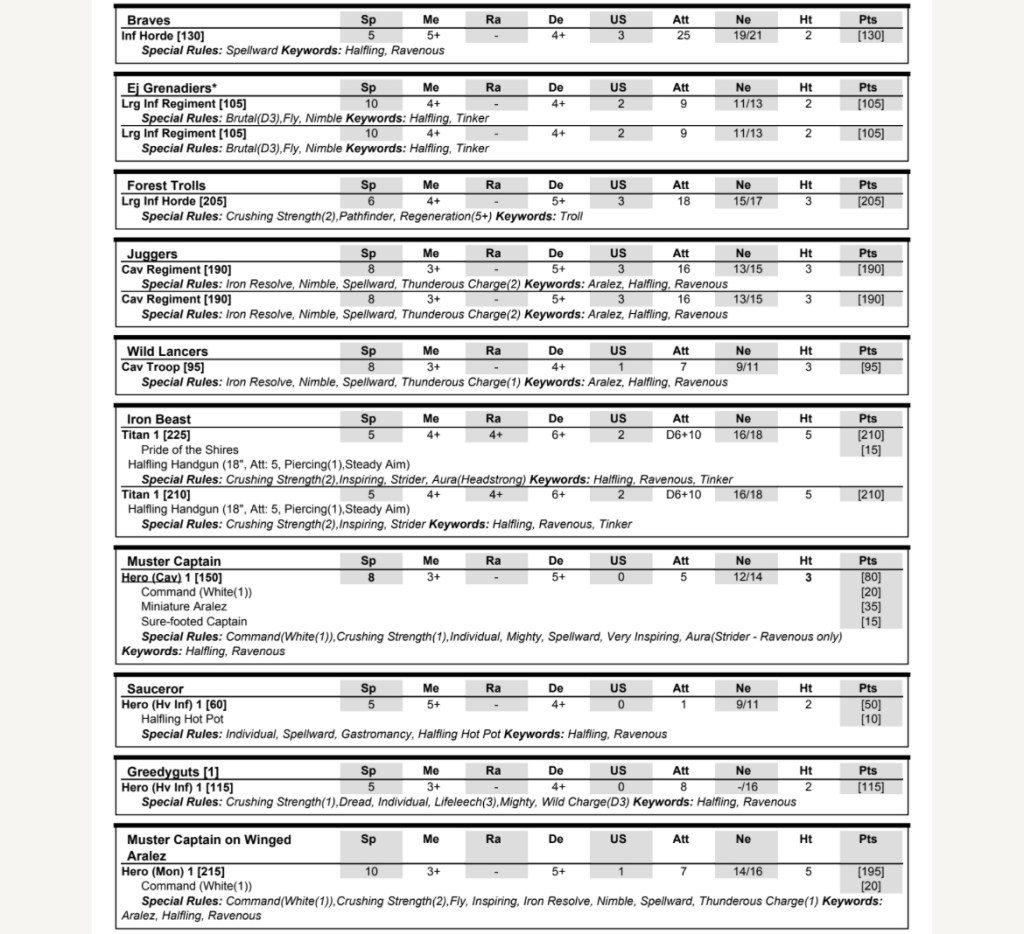
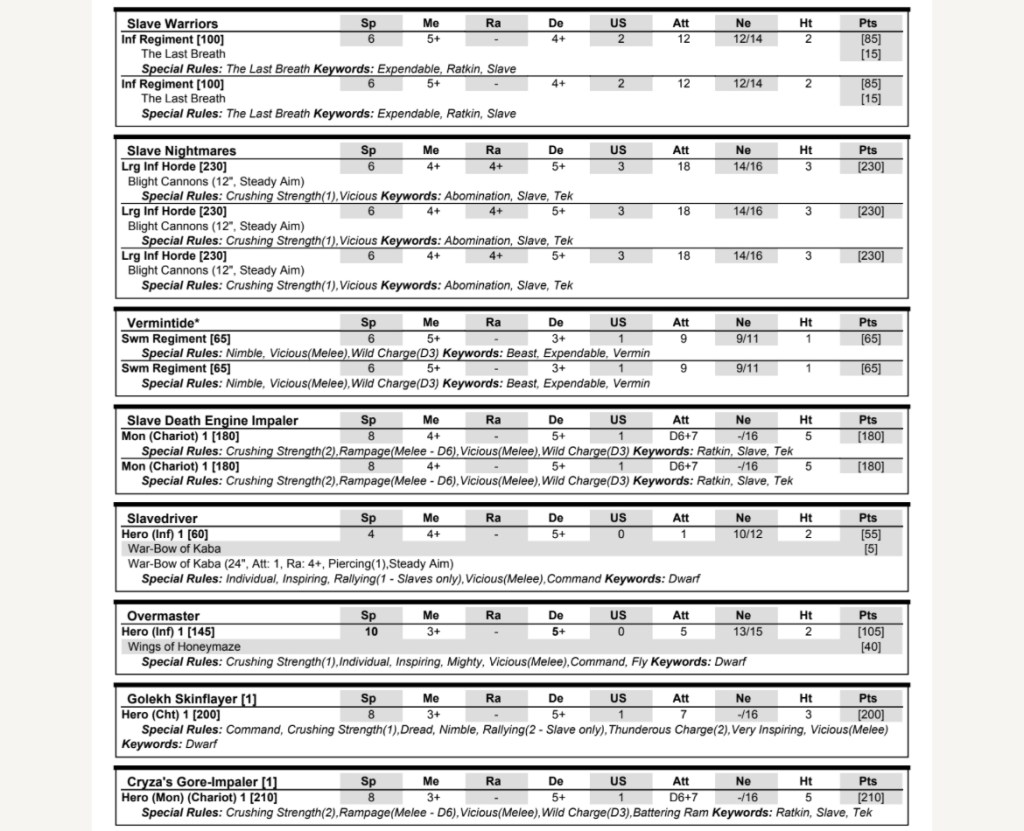
I think Ratkin Slaves are a really underrated army (and I’m not just saying that because of what happened in Hinckley). Whilst they certainly don’t have the range of units and builds of other factions, they do have a couple of really sturdy lists, of which my opponent was using one. The army is built around three hordes of nightmares, which I think are often underestimated in both Ratkin and Slave builds because as an individual unit on paper they look expensive for what you get. However, there is definitely a return on investment for multiple units and when you factor in available synergies you can build a truly terrifying battle group. Then there are the multiple impalers, with their massive charge range and chariot bases mean multi-charges are hard to avoid, with rampage making them particularly terrifying for infantry and cavalry. Combining these two elements creates a lot of pressure from the get go.

Kicking off
We played Hold the Line and the Halflings went first. I can’t remember whether it was my choice or not, but I was really happy as the various threat ranges the slaves can deploy allow them to put a lot of pressure on from the first turn of the game, so I wanted to deny them that initial movement opportunity.
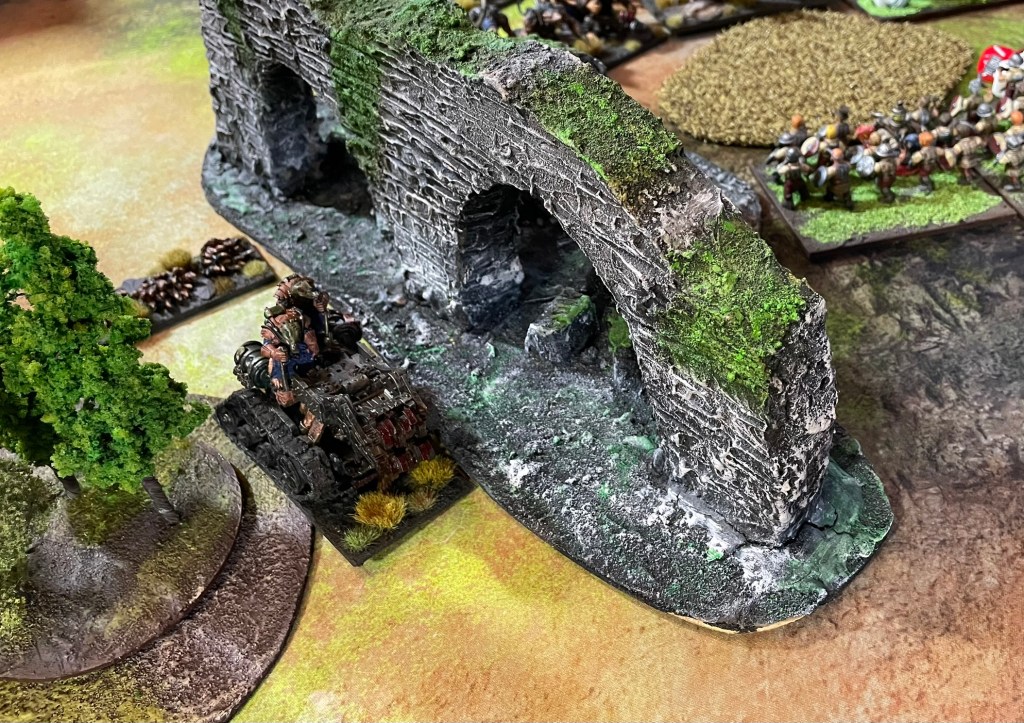
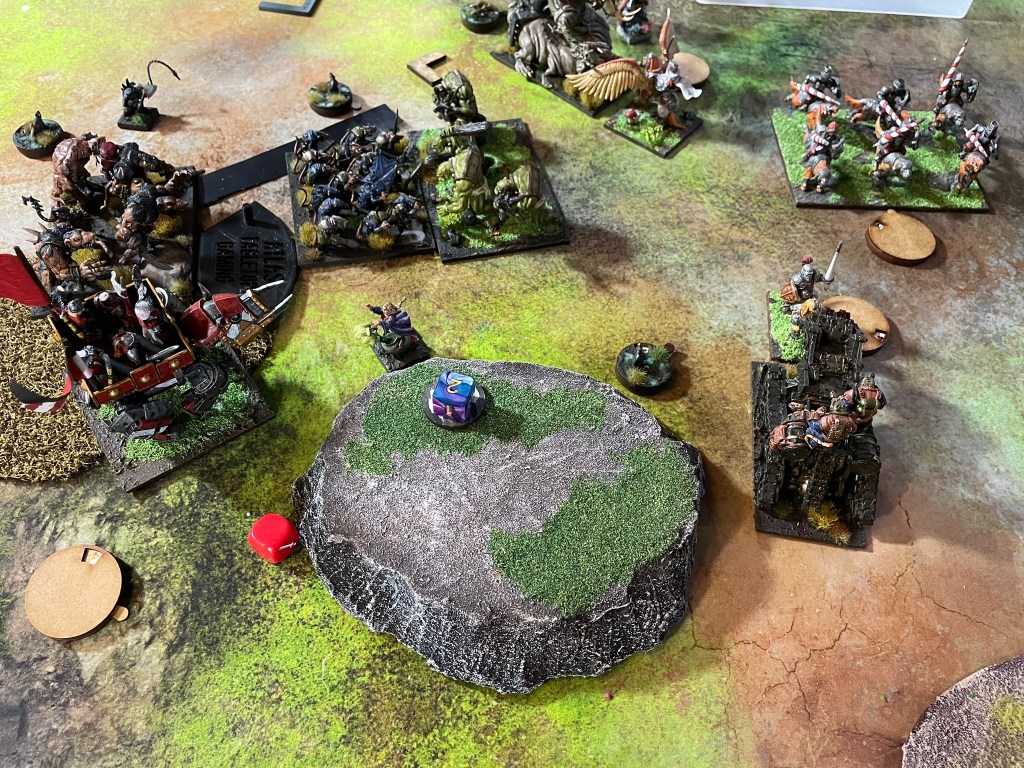
Set up had brought some interesting decisions because the placement of a very large piece of blocking terrain made easy access to a third of the scoring zones, on the left, difficult. I decided that rather than contest that section of the board I would let it go and focus on the remaining scoring zones. The plus side of this meant that my opponent would likely use one unit to secure it, taking them out of the game and giving my full force a slight advantage in the killing stakes. Happily, the slaves deployed Cryza’s Impaler and a vermintide regiment in the deserted left flank, meaning that both would be out of the game for at least three turns.


Everything else the slaves brought to the table was deployed in the centre of the board with the nightmares dead centre and the impalers, with Golekh and the flying Overlord, deploying on my right. The Halflings stretched out across the board with the infantry in the centre and the cavalry out on the right.
The first couple of turns were all about positioning. My cavalry make great targets for impaler multi charges and I didn’t want them breaking too early in the game. In addition to this the impaler base sizes make them really difficult to get mutli charges against, so whilst the cavalry were doing their best to keep out of the reach of the impalers, the infantry and the pigs were doing their best to close the gap with the nightmares as quickly as possible, massively helped by stealthy from the command dice.
Engagement
My grenadiers are always the MVPs playing the slaves as they can outrange both the impalers and the nightmares. Dropping them into combat with one of each of these units created opportunities to close. An iron beast and the trolls smashed into one horde of nightmares, whilst the braves moved to block the other two nightmare hordes from getting a flank charge on the iron beast in case the charge didn’t break the hulking rat gunners. Fortunately, the charge prevailed, but in an all too reminiscent pattern of behaviour, the reform resulted in me exposing the protected flank of the beast which was punished immediately by a hindered flank charge from the nightmares and a front charge from some slave warriors.


The follow up charge to the grenadiers distracting the impalers was no way near as successful. My cavalry wasn’t in the best position, and I could only get a troop of wild lancers in with Greedyguts. This game saw me use Greedyguts particularly ineffectively and I threw him away supporting the wild lancers, rather than using him in about a hundred different ways that would have all, in retrospect, been so much better. The wild lancers and Greedyguts failed to do much to the impaler they charged and were then destroyed in the following turn.
The damage they did allowed a charge from one of the Jugger regiments to take the impaler off next turn, but there were still a lot of heavy hitters hanging around that had to be treated with extreme care.
Threats from the flanks
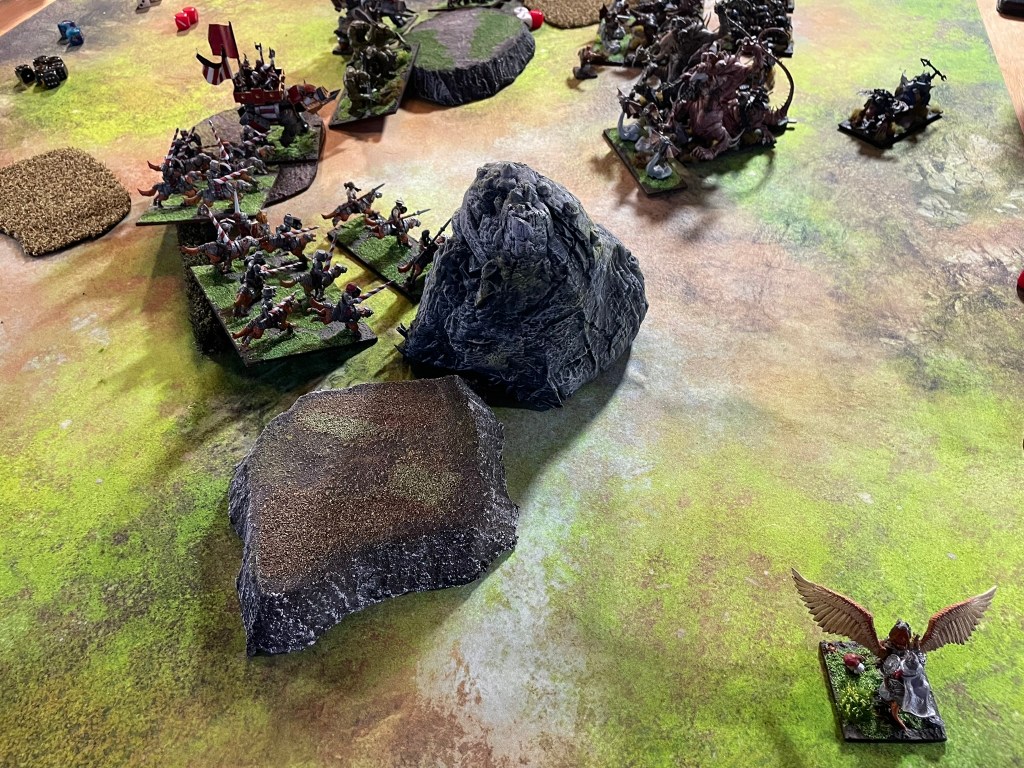
With the battle joined in the centre, both armies were now grinding hard, conscious that the pressure was about to ramp up. Cryza’s Impaler was making its way behind the massive piece of blocking terrain, and my lines, on the left. On the right my muster captain on his winged aralez was hovering just outside the charge range of Golekh and the Overlord waiting for an opportunity.
The presence of these threats created a number of challenges, which resulted in some interesting decisions. In an attempt to break through the halflings Golekh charged the mounted muster captain but failed to break him. This created a golden opportunity to remove a real lynch pin unit (rally 2, dread and inspiring on one unit is so good). The trolls had a flank on him, but I couldn’t trust them to do the job, so the flying muster captain went into the other flank. The angry dwarf disappeared, and I breathed a sigh of relief, which was quickly tempered by the impending charge from Cryza’s Impaler on a regiment Juggers.
In the centre things were getting tense. The iron beast had survived the flank charge from the nightmares, but it was in danger of getting overrun by the remaining hordes and rat warrior regiments. The Pride of the Shires charged the unengaged horde, and I crossed my fingers.


Two turns of fighting saw the Pride overcome its opponents before turning to face the last standing horde of nightmares that had just reduced the other iron beast to a pile of scrap. The slave warriors that had been engaged with the nightmares were now engaged with the forest trolls, and the trolls were not making much headway. This scenario played out across the field where the flying muster captain was butting heads with the final impaler and the last regiment of Juggers were held at bay by a regiment of vermintide.
The bloody battle had cost both sides dearly and as the rats entered their sixth turn it became apparent just how much of a stalemate the game had become. The rats had won the empty left flank with a regiment of vermintide. The combat had kept everything in the central section of the board, but the speed of the Halfling’s advance and their refusal to give ground meant that both armies only had one scoring unit in the central scoring zone. The rats had Cryza’s Impaler and the Halflings had the Pride of the Shires, meaning the Halfings had the win, however the rats had a choice to make. Cryza’s Impaler could take the right flank scoring zone and secure a turn 6 win, but in turn 7 the Juggers, freed from the vermintide would be able to also move into the zone and the chariot would not be able to respond to them as it would be facing the wrong way.
In the centre things were equally unclear, as the Pride of Shires would likely have been able to keep the last remaining nightmares out of the scoring zone and if the trolls killed the rats there was a chance for them to sidestep into the scoring zone. The downside was the Halflings had about 49 seconds on the clock, so lots to do in not much time.
Happily, the dice decided there would be no turn seven. I say this quite genuinely as 49 seconds would unlikely have been enough time to properly do everything I wanted to, as there was also an option for the Pride to shoot at the nightmares, which could have caused further issues for the rats either through a waiver or the removal of the unit. I’m not a fan of losing a game as a result of clocking out, I’d much rather lose it at the end of a game turn. The final photo might suggest the Juggers landed the scoring zone, but that was just a bit of wishful thinking.
All in all, it was an absolutely brilliant game with the rats taking a hard-fought and well-deserved victory at four points to three.
Final thoughts
I’m really enjoying my journey with the Halflings. They’re a very interesting army to play, and I can see why so many people are playing them. Although the wins and losses don’t necessarily bear this out, I feel that I’m definitely improving and every game feels close, which makes the very best gaming experience for me. It might sound a little self-congratulatory, but I think the inclusion of the second pig has really made my 1995 list about as good as it’s going to get, so I’m hoping that stays true for my 2,300 list. I’m already playing around with a couple of changes for the next event, which will be 2,300, because whilst I love the Jugger horde, it does still feel a bit like putting too many eggs in one basket. Interestingly, I feel as though the list I’m now building is tracking back towards my first tournament list back in 2023 (but without the balloons that I will not be putting back into the list under any circumstances – I’ve said it. I don’t like balloons).
All that remains is for me to say a massive thanks to Steve Hildrew for running a highly enjoyable tournament and my opponents for some really enjoyable games.
If you enjoyed this post, and don’t want to miss out on future ones, you can drop you email below and you won’t (provided you check your email occasionally).
